Technical Insights: Azure, .NET, Dynamics 365 & EV Charging Architecture

Author: fransiscuss Page 7 of 19

Styles in Silverlight

In silverlight, normally we apply style per XAML file by adding the style into UserControl.Resources section. Sample below

http://pastebin.com/embed_iframe.php?i=FgjnHqAT

and to apply the style in the control we do

http://pastebin.com/embed_iframe.php?i=veWGiyNh

but let’s say you want to have a global style to all of your XAML, how do you do that?You can put your style into app.xaml and then the way to refer the style in your control is as per above so basically the way you apply the style will remain the same but the difference is only where you put the style

http://pastebin.com/embed_iframe.php?i=8cw0x8h0

Process of Improving Software Quality

I would like to share my working experience at VMWare, in this last 1 year we have been improving a lot in our software development process

Last year, We had much much higher regression rate and it’s all back to the battle against developers and QA. We as developer always try to make our self look right and always feel confident that we are taking the right approach and there is no flaw in our code.

Once the build is started and installed, then QA start raising bugs to us and this process of back and forth is really not efficient and causing the software released to be delayed, frustrated developers and frustrated QA and it affects the whole thing

So how do we improve the quality

1. Code Review

-We are using Review Board to do code review before we check in the code and not after. We need to get “Review Passed” by other developer before we can check in (we use post-review command line with the changeset number to post the review)

-We need to write down our “Unit Testing” (e.g login to admin, press button A then it shows ABC) in our review

*We don’t use TFS but TFS has its own code review, but if you want to use Review Board for TFS then you can read awesome article here

2. User Acceptance Criteria

-This is a simple things that we never thought before, what we are doing now is to sit to have a developer and QA to sit together and draft the test cases for a task that the developer is going to do

-Important, we don’t start the coding first. By doing this, the developer can think about their solution carefully before writing the code and look from the broader perspective

3. Unit testing

when you have your code base flexible or modular then you can start writing unit test first before start writing the code. So you write the code to pass that unit testing criteria – TDD (Test Driven Development)

-When I say the code base is flexible or modular means that it is possible for you to inject your unit testing with some fake data/implementation

4. Developer need to be pride with its own code

We as the developer need to put pride in the code, we need to be able to explain of what your code does to other developer

-Developer need to be able to explain why your coding/solution approach is better than other coding/solution approach

-Always think maintainability, make sure you are not over engineered the solution and make sure the code is easy to understand and maintained. Make sure the code can be extensible easily in the future by other developer

-Always think scalability, how scalable is your solution when the system is growing larger

-Don’t forget to put comment in your code because it will help a lot for other developers

Conclusion

This all will take longer to start doing this, but once you and the team get used to this process then you will see the better quality of software and less frustration for the developers and QA. It will be faster at the end of the day because of less bounce back from the QA team to the developer and it results on more productivity for both teams.

It’s not a simple process but one keyword that you need to keep in mind “Believe” that this process will work

MSMQ – Basic Tutorial

I write this article in advance for my technical presentation. MSMQ is a messaging platform by Microsoft and it is built-in on the OS itself.

Installation

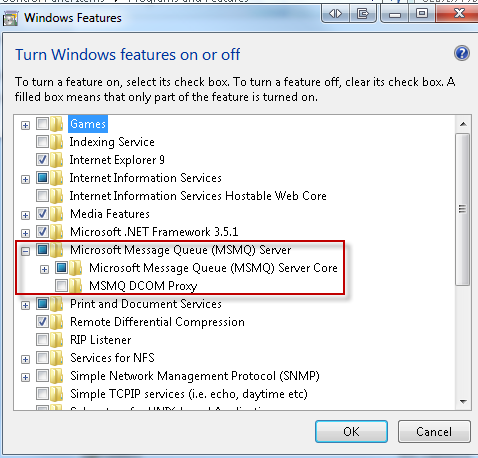
1. To install MSMQ, you can go to “Add/Remove program” then go to “Turn Windows features on or off” and then check “Microsoft Message Queue” Server

2. Check in the Services (services.msc), it will install “Message Queuing” service and “Net.Msmq Listener Adapter” and it should be automatically started once you have installed it

3. Make sure that these ports are not blocked by your firewall because MSMQ are using this ports

TCP: 1801
RPC: 135, 2101*, 2103*, 2105*
UDP: 3527, 1801

Basic Operation

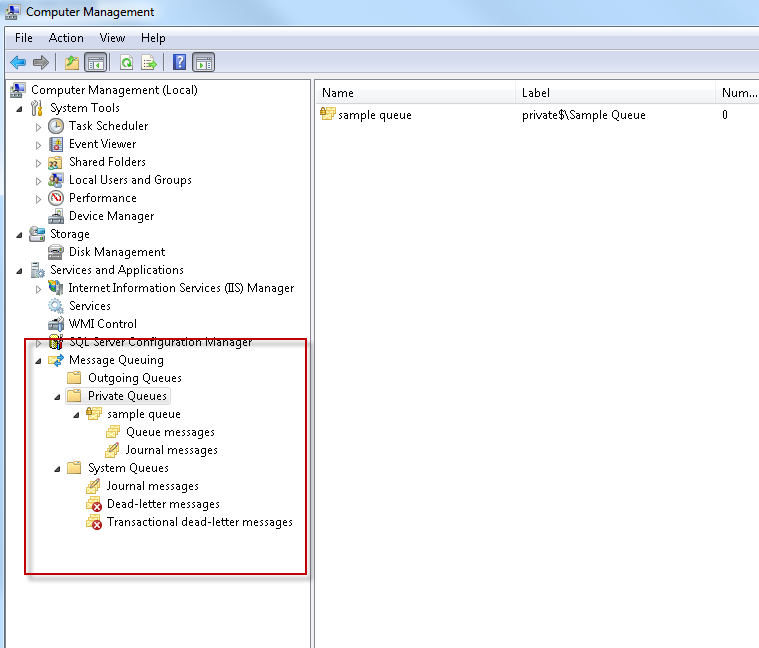
1. in order to see your queue, you can go to “computer management – right click my computer and select manage”. Go to Services and Applications node and there will be a sub node called as “Message Queuing”

2. From this console, you can see all the messages that you want to see

3. in my presentation slides there are definitions of private queues and public queues or you can get more detail from MSDN.

4. For this tutorial, please create a private queue called as “Sample Queue” by right clicking the private queue and select “Add”

Coding tutorial

*Please import System.Messaging

1. How to send a message into a queue

Code Snippet
  1. private const string MESSAGE_QUEUE = @”.\Private$\Sample Queue”;
  2.         private MessageQueue _queue;
  3.         private void SendMessage(string message)
  4.         {
  5.             _queue = new MessageQueue(MESSAGE_QUEUE);
  6.             Message msg = new Message();
  7.             msg.Body = message;
  8.             msg.Label = “Presentation at “ + DateTime.Now.ToString();
  9.             _queue.Send(msg);
  10.             lblError.Text = “Message already sent”;
  11.         }

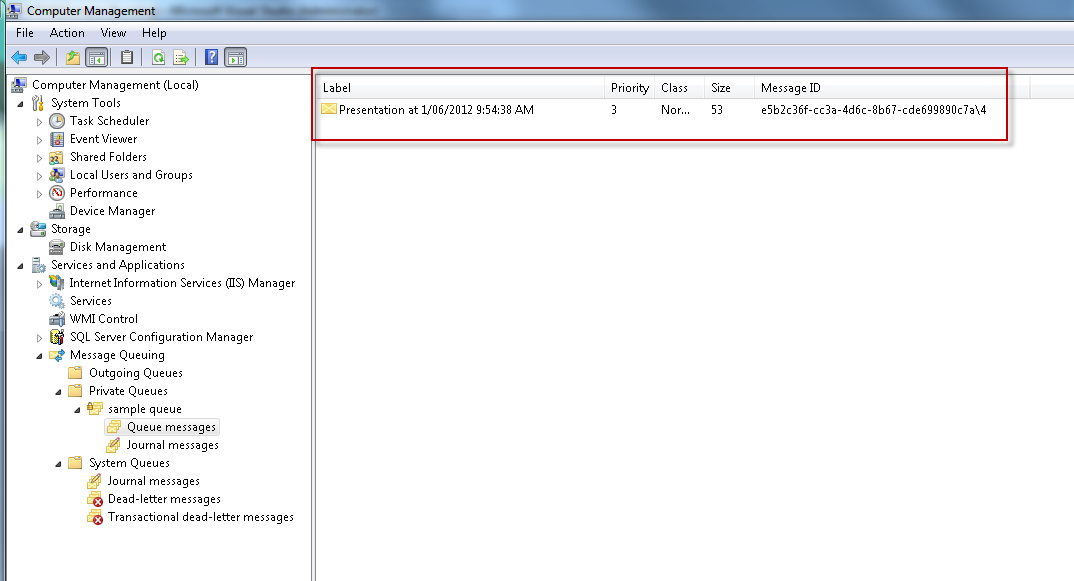
2. Check the queue through MMC console – right click and select refresh

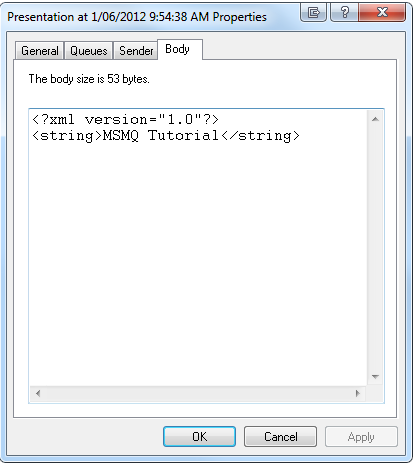
2. Right click on the message and go to Body then you can see that the message is being stored as XML

3. How to process the queue?See the code snippet below

Code Snippet
  1. private const string MESSAGE_QUEUE = @”.\Private$\Sample Queue”;
  2.         private static void CheckMessage()
  3.         {
  4.             try
  5.             {
  6.                 var queue = new MessageQueue(MESSAGE_QUEUE);
  7.                 var message = queue.Receive(new TimeSpan(0, 0, 1));
  8.                 message.Formatter = new XmlMessageFormatter(
  9.                                     new String[] { “System.String,mscorlib” });
  10.                 Console.WriteLine(message.Body.ToString());
  11.             }
  12.             catch(Exception ex)
  13.             {
  14.                 Console.WriteLine(“No Message”);
  15.             }
  16.         }

Queue.Receive is a synchronous process and by passing the timespan into the function, meaning that it will throw exception of Timeout if it hasn’t received any within the duration specified

-The formatter is used to cast back to the original type

-Then you can collect the message by using “Message.Body”

-Once it’s done the message will be removed from your queue

Conclusion

Pros:

Ready to be used – It provides simple queuing for your application without you need to recreate one/reinvent the wheel

Interoperability – It allows other application to collect/process the message from MSMQ

Cons:

-Message poisoning can happen (when a message cannot be process and blocks entire queue)
-Message and queues are in proprietary format which cannot be edited directly
-The only tool is MMC administration console, or you can buy QueueExplorer (3rd party software
)

My Slides:

http://portal.sliderocket.com/vmware/MSMQ-Microsoft-Message-Queue

*DISCLAIMER:this tutorial does not represent the company that I’m working for in any way. This is just a tutorial that I created personally


Protection software for my laptop

Just recently been suggested by my colleague to use these software for antivirus, firewall and spyware protection. It’s all free and lightweight

Avast Anti Virus – http://www.avast.com/en-au/index
Comodo Firewall – http://personalfirewall.comodo.com/free-download.html
Malware Bytes – http://www.malwarebytes.org/products/malwarebytes_free

Table Spool (Lazy Spool) in SQL Server 2005

I have a web app that recently timing out and the timing out exception is actually coming from the SQL Server. When I run the execution plan I found that there is one item called Table Spool (Lazy Spool) which is costing about 20%. I thought it was caused by my full text search but when I drilled down further more is because of DISTINCT keyword. So I decided to change to use GROUP BY instead. In my case it is only a single column so It won’t make any difference at all. Once I’ve changed that my web application running fast and no more timeout

I got this explanation from this website

Explain Distinct:
3) We do an all-AMPs RETRIEVE step from … by way of an
all-rows scan with no residual conditions into Spool x
(group_amps), which is redistributed by hash code to all AMPs.
Then we do a SORT to order Spool 1 by the sort key in spool field1
eliminating duplicate rows.

First there’s a redistribution, then duplicate rows are removed:
Efficient, if there are just a few rows per value [per AMP].
Spool size is always about the same, but may be extremely skewed → 2646: No more Spool Space

Explain Group By:
3) We do an all-AMPs SUM step to aggregate from … by way
of an all-rows scan with no residual conditions, and the grouping
identifier in field 1025. Aggregate Intermediate Results are
computed globally, then placed in Spool x.

First each AMP removes duplicate rows locally (first aggregate) and hashes/redistributes the resulting
rows, then there’s a second aggregation to remove duplicate rows:
Efficient, if there are lots of rows per value [per AMP].
Large number of rows per value Spool → small spool size
Small number of rows per value Spool → large spool size
Spool is never skewed.

Other interesting fact quoted from this article/discussion

http://www.simple-talk.com/sql/learn-sql-server/showplan-operator-of-the-week—lazy-spool/

http://www.sql-server-performance.com/forum/threads/table-spool-lazy-spool.15647/

INDEXING: Take a look at your indices to make sure that they’re all covering the columns that you’re selecting out of the tables. You’ll want to aim to get all the columns included in JOINs and WHERE clauses within the indices. All other columns that are in the SELECT statements should be INCLUDEd, or covered, by the index.

OPERATORS: See if you can get rid of the not equals (“<>”) operators, in favor of a single greater than or less than operator. Can this statement and T.CurrentHorizon <> 0 be changed to this and T.CurrentHorizon > 0?

JOINS: Get rid of the subqueries that are JOINing to tables outside of themselves. For instance, this line and FV2.elementId = FV.elementID might be causing some problems. There’s no reason you can’t move that out of a subquery and into a JOIN to dbo.aowCollectedFact FV, given that you’re GROUPing (DISTINCT) in the main query already.

DISTINCT: Change it to a GROUP BY. I’ve got no reason other than, because it’s good practice and takes two minutes.

LAST NOTE: The exception to all the above might be to leave the final subquery, the IF NOT EXISTS, as a subquery. If you change it to a JOIN, it’ll have to be a LEFT JOIN...WHERE NULL statement, which can actually cause spooling operations. No great way to get around that one.

Simple Paging using jQuery -Pajinate

By using this library, it allows you to do the paging through the HTML DOM from the client side  (Note: this is not about the ideal way or not the ideal way, I know the ideal way is to do paging server side)

To implement you just need to do 3 things:

1. Create a div container that wraps the container of item that you want to repeat and the navigation div, you can call it whatever you want

2. Create a div inside the container with class “page_navigation”

3. put class “content” on the container of the list item

Sample

Code Snippet
  1. <div id=”page_container”>
  2.     <div class=”page_navigation”></div>
  3.     <ul class=”content”>
  4.         <li>
  5.             <p>One</p>
  6.         </li>
  7.         <li>
  8.             <p>Two</p>
  9.         </li>
  10.         <li>
  11.             <p>Three</p>
  12.         </li>
  13.         <li>
  14.             <p>Four</p>
  15.         </li>
  16.         <li>
  17.             <p>Five</p>
  18.         </li>
  19.         <li>
  20.             <p>Six</p>
  21.         </li>
  22.         <li>
  23.             <p>Seven</p>
  24.         </li>
  25.         <li>
  26.             <p>Eight</p>
  27.         </li>
  28.     </ul>
  29. </div>

and I put this code on the document.ready event based on the id set on item 1

Code Snippet
  1. <SCRIPT>
  2.     jQuery(document).ready(function () {
  3.         jQuery(‘#page_container’).pajinate({ items_per_page: 2 });
  4.     });
  5. </SCRIPT>

The source code can be downloaded from here

and you can read the documentation from this github page

Yield keyword in .NET

I believe some of you already know about this but for me I never used it. Yield keyword has been existed since .NET 2.0 so I decided to look up of what it does and try to understand it

Based on MSDN

Yield is used in an iterator block to provide a value to the enumerator object or to signal the end of iteration, it takes one of the following form

Based on my understanding

Yield is a concatenation for a collection, or in SQL we normally use UNION

Yield break; is used to exit from the concatenation (remember it is not used to skip !)

One practical sample that I can think of is to get the enumerable of exception from inner exception (e.g stack trace)

sample code

Code Snippet
  1. class Program
  2.     {
  3.         ///<summary>
  4.         /// simple function to return IEnumerable of integer
  5.         ///</summary>
  6.         ///<returns></returns>
  7.         private static IEnumerable<int> GetIntegers()
  8.         {
  9.             for (int i = 0; i <= 10; i++)
  10.                 yield return i;
  11.         }
  12.         ///<summary>
  13.         /// simple function to return collection of class
  14.         ///</summary>
  15.         ///<returns></returns>
  16.         private static IEnumerable<MyClass> GetMyNumbers()
  17.         {
  18.             for (int i = 0; i <= 10; i++)
  19.                 if (i > 5)
  20.                     yield break;
  21.                 else
  22.                     yield return new MyClass() { Number = i };
  23.         }
  24.         internal class MyClass
  25.         {
  26.             public int Number { get; set; }
  27.             public string PrintNumber
  28.             {
  29.                 get {
  30.                     return “This is no “ + Number.ToString();
  31.                 }
  32.             }
  33.         }
  34.         static void Main(string[] args)
  35.         {
  36.             Console.WriteLine(“Simple array of integer”);
  37.             foreach (var number in GetIntegers())
  38.                 Console.WriteLine(number.ToString());
  39.             Console.WriteLine();
  40.             Console.WriteLine(“Collection of classes”);
  41.             foreach (var myclass in GetMyNumbers())
  42.                 Console.WriteLine(myclass.PrintNumber);
  43.             Console.ReadLine();
  44.         }
  45.     }

Output

Simple array of an integer
0
1
2
3
4
5
6
7
8
9
10Collection of classes
This is no 0
This is no 1
This is no 2
This is no 3
This is no 4
This is no 5

Knockout MVVM Javascript

Knockout allows you to bind the HTML to your javascript object. It simplifies DOM manipulation and allow the portability of the javascript object and action. It is pretty much the same concept as MVVM in silverlight. You can wire up the function with button click easily, you can have for each against your array (e.g like repeater). It is so elegant, but debugging sometimes can be challenging as well. I’ve used Knockout along with JSON that allows me to build rich and interactive website

2 powerful function: ko.observable – this allow knockout to monitor this object value, ko.observableArray this is the extension of ko.observable against the array. With observable, knockout will keep tracking the value of that property and allow the DOM that has been bind against it to refresh

You can bind initial data from your MVC model to the variable in javascript and bind it, in this sample below, I use ToJson extension function

Code Snippet
  1. namespace System.Web.Mvc
  2. {
  3.     public static class HtmlHelperExtensions
  4.     {
  5.         ///<summary>
  6.         /// Serializes an object to Javascript Object Notation.
  7.         ///</summary>
  8.         ///<param name=”item”>The item to serialize.</param>
  9.         ///<returns>
  10.         /// The item serialized as Json.
  11.         ///</returns>
  12.         public static string ToJson(this object item)
  13.         {
  14.             return new System.Web.Script.Serialization.JavaScriptSerializer().Serialize(item);
  15.         }
  16.     }
  17. }

Sample code

Code Snippet
  1. <script type=”text/javascript”>
  2.     var initialData = @(new MvcHtmlString(Model.ToJson()));
  3.     function JobResultViewModel()
  4.     {
  5.         var self = this;
  6.         self.Jobs = ko.observableArray(initialData.JobSearchResults);
  7.         self.Search = ko.observable(initialData.JobSearchModel);
  8.         self.Pageno = ko.observable(initialData.PageNo);
  9.         self.TotalPage = ko.observable(initialData.TotalPage);
  10.         self.TotalRecord = initialData.TotalRecord;
  11.         self.ShowNextButton = ko.computed(function(){
  12.                                             return self.Pageno() < (self.TotalPage() – 1);
  13.                                             });
  14.         self.LoadNextPage = function() {
  15.                                $.getJSON(@Url.Action(“ResultJson”), {  Keyword: (self.Search().Keyword == null) ? “” : self.Search().Keyword,
  16.                                                                       ProfessionId: self.Search().ProfessionId,
  17.                                                                       RoleIds: self.Search().RoleId,
  18.                                                                       SalaryTypeId: self.Search().SalaryTypeId,
  19.                                                                       SalaryFromId: self.Search().SalaryFromId,
  20.                                                                       SalaryToId: self.Search().SalaryToId,
  21.                                                                       LocationId: self.Search().LocationId,
  22.                                                                       AreaIds: (self.Search().AreaId.length == 0) ? 0 : self.Search().AreaId,
  23.                                                                       WorkTypeId: self.Search().WorkTypeId,
  24.                                                                       Pageno: self.Pageno() + 1
  25.                                                                    }, function (SearchResult) {
  26.                                                                             $.each(SearchResult, function(i, item)
  27.                                                                             {
  28.                                                                                 self.Jobs.push(item);
  29.                                                                             });
  30.                                                                             self.Pageno(self.Pageno() + 1);
  31.                                                                             //we need to refresh the repeater when we use jquery mobile ONLY
  32.                                                                             $(“#JobRepeater”).listview(“refresh”);
  33.                                                                         });
  34.                                         }
  35.     }
  36.     ko.applyBindings(new JobResultViewModel());
  37. </script>
  38. <h2>Result</h2>
  39. <h1>There are <span data-bind=”text: TotalRecord”></span> jobs</h1>
  40. <a>Save Search</a>
  41. <ul name=”JobRepeater” id=”JobRepeater” data-role=”listview” data-bind=”foreach: Jobs”>
  42.     <li><a data-bind=”attr: { href: UrlAction, title: JobName },text : JobName”></a><span data-bind=”text: Description”></span></li>
  43. </ul>
  44. <div data-bind=”visible: ShowNextButton”>
  45.     <input type=”button” id=”btn_load_next” value=”Load More” data-bind=”click: LoadNextPage”/>
  46. </div>

Source:

Knockout Tutorial

Knockout Tips

Custom Authorize Attribute and HTTP 403

In this post, I want to outline in how to create your own Authorize tag and to make sure when you call JSON method with your custom authorize attribute to throw HTTP403 – Forbidden

1. You need to create your own Attribute inherits from AuthorizeAttribute

2. AuthorizeCore is the logic that defines whether you are authorized or not

3. OnAuthorization defines the behaviour when you are not authorized. In this case we want to throw HTTP 403 – forbidden. By doing this in your Javascript, you can catch this 403 error and throw friendly error message to the user

Code Snippet
  1. public class CustomAuthorizeAttribute : AuthorizeAttribute
  2.     {
  3.         protected override bool AuthorizeCore(HttpContextBase httpContext)
  4.         {
  5.             if (httpContext == null) throw new ArgumentNullException(“httpContext”);
  6.             return (SessionData.Member != null && SessionData.Member.MemberId > 0);
  7.         }
  8.         public override void OnAuthorization(AuthorizationContext filterContext)
  9.         {
  10.             base.OnAuthorization(filterContext);
  11.             if (filterContext.Result == null)
  12.             {
  13.                 return;
  14.             }
  15.             else if (filterContext.Result.GetType() == typeof(HttpUnauthorizedResult)
  16.                 && filterContext.HttpContext.Request.IsAjaxRequest())
  17.             {
  18.                 filterContext.Result = new ContentResult();
  19.                 filterContext.HttpContext.Response.StatusCode = 403;
  20.             }
  21.         }
  22.     }

You don’t need to do anything in your controller to implement HTTP403, it is all derived from the custom attribute, you just need to use the attribute and everything will be taken care of. Sample usage

Code Snippet
  1. [CustomAuthorize]
  2.         public ActionResult SaveJobJSON(int jobid)
  3.         {
  4.             string message = string.Empty;
  5.             bool successful = false;
  6.             JobsSavedService JobsSavedService = new JobsSavedService();
  7.             successful = JobsSavedService.SavedJobForMember(jobid, ref message);
  8.             JobsSavedService = null;
  9.             return Json(new { successful = successful, message = message }, JsonRequestBehavior.AllowGet);
  10.         }

Browser Extension Plugin for VS2010

This is a nice extension for VS2010 to allow you to change the default browser on debugging mode

http://visualstudiogallery.msdn.microsoft.com/bb424812-f742-41ef-974a-cdac607df921

Page 7 of 19

Powered by WordPress & Theme by Anders Norén