Logging in .NET – Elastic Search, Kibana and Serilog

I’ve been using log4net in the past and I found it quite useful as it is ready to use out of the box. In my last workplace, we are using SPLUNK and its amazing as I’m able to troubleshoot production issue by looking at the trend and activities. You can do query based and filtering the log and build a pretty dashboard. Downside of it is the cost for Splunk is expensive (i don’t think its for the mainstream user or small business)

So I’ve found another logging mechanism/storage/tool which is amazing!! It is called Elastic Search and its open source (well there are different subscriptions level for better supports). Pretty much Elastic Search is the engine for search and analytics

How about the GUI/Dashboard?Yes you can use Kibana. It is an open source data visualization platform that allows you to interact with data

Ok, so lets say if I have a .NET, how do I write my log to Elastic Search?You can use SeriLog. It will allow you to log structured event data to your log and you can use Serilog Elastic Search sink to integrate with Elastic Search

Serilog has different sink providers that allow you to store your log externally (beside file) including SPLUNK

I will talk more about Serilog separately in different post, stay tune!

Fusion Log – Assembly Logging

Another helpful debugging tool that can be used is FusionLog – it is already installed in your machine by default and what this tool does is basically logging and telling us where the assembly is loaded from either local or GAC or some other location and at the same time it tells you it couldn’t locate the assembly

-First create a folder called “FusionLog” on C drive or any location with any name

-Open your Regedit to add the key below

HKEY_LOCAL_MACHINESOFTWAREMicrosoftFusion

Add:

DWORD ForceLog set value to 1

DWORD LogFailures set value to 1

DWORD LogResourceBinds set value to 1

String LogPath set value to folder for logs (e.g. C:FusionLog)

Make sure you include the backslash after the folder name and that the Folder exists.

-Restart your computer

-Run your application

-Look the assembly name from c:fusionlog

-Open the file and it will tell you where the assembly is loaded from

Entity Framework – Schema MigrateDatabaseToLatestVersion

I’ve been using EF for quite sometimes and I use Code First to build my schema. The question that I always have in mind is “Once the project is released and we need to add a new entity or add a new column  to the existing entity, how do we tackle that?” and the question is even asked by my colleague. My answer was “oh, we can track down our changes by hand on a SQL file” and “I also try to be smart by saying we can get the latest production DB and compare it with the Development DB locally by using Database project or by using RedGate Schema Compare”


I’m still not happy even with my own answer!! and I believe that it’s not only me facing this problem and Microsoft should be smart enough to tackle this problem. So I start doing my research and I found the answer that I’m looking for – EF has an initializer called “MigrateDatabaseToLatestVersion” which accept 2 parameters DB Context and Configuration. So what is Configuration?It is a class that inherits from DbMigrationsConfiguration

So how do I get this class?There are 2 possible ways:

1. Use PackageManager Console (on your data layer project) and type the code below and it will create a new folder called “Migration” and a file with name “Configuration”

PM>enable-migrations -enableautomaticmigration 

2. Create a file called “Configuration.cs/.vb” or with whatever name that you wanted and paste the code below

namespace GenericSolution.Data.Migrations
{
    using System;
    using System.Data.Entity;
    using System.Data.Entity.Migrations;
    using System.Linq;
    using GenericSolution.Data;

    internal sealed class Configuration : DbMigrationsConfiguration<GenericSolutionContext>
    {
        public Configuration()
        {
            AutomaticMigrationsEnabled = true;
            //***DO NOT REMOVE THIS LINE, 
            //DATA WILL BE LOST ON A BREAKING SCHEMA CHANGE,
            //TALK TO OTHER PARTIES INVOLVED IF THIS LINE IS CAUSING PROBLEMS    
            AutomaticMigrationDataLossAllowed = true;
        }

        protected override void Seed(GenericSolutionContext context)
        {
            //  This method will be called after migrating to the latest version.

            //  You can use the DbSet<T>.AddOrUpdate() helper extension method 
            //  to avoid creating duplicate seed data. E.g.
            //
            //    context.People.AddOrUpdate(
            //      p => p.FullName,
            //      new Person { FullName = "Andrew Peters" },
            //      new Person { FullName = "Brice Lambson" },
            //      new Person { FullName = "Rowan Miller" }
            //    );
            //
        }
    }
}

*AutomaticMigrationDataLossAllowed is a property that allow you to automatically drop the column from the schema when you remove a property from your entity class. By default, it sets to false which means it will throw an exception “AutomaticDataLossException” when you try to remove column from your table. So please use it cautiously

Next step is to use this configuration on your DBContext initializer which can be on your DBFactory class

public DBFactory()
        {
            //Create database when not exists with code below
            //Database.SetInitializer(new CreateDatabaseIfNotExists<GenericSolutionContext>());

            //Pass null when you already have the database exists and no changes
            //Database.SetInitializer<GenericSolutionContext>(null);

            //Automatic schema migration
            Database.SetInitializer(new MigrateDatabaseToLatestVersion<GenericSolutionContext, Configuration>());

        }

There is another class that will create an empty migration so that the future migrations will start from the current state of your database. I will update this blog once I know in detail about the functionality of it

1. Getting it by using PM Console

PM> Add-Migration InitialMigration -IgnoreChanges

2. Create a class

namespace GenericSolution.Data.Migrations
{
    using System;
    using System.Data.Entity.Migrations;
    
    public partial class InitialMigration : DbMigration
    {
        public override void Up()
        {
        }
        
        public override void Down()
        {
        }
    }
}

MSMQ – Basic Tutorial

I write this article in advance for my technical presentation. MSMQ is a messaging platform by Microsoft and it is built-in on the OS itself.

Installation

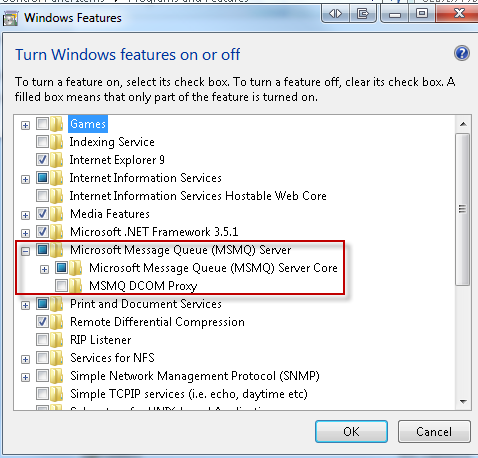
1. To install MSMQ, you can go to “Add/Remove program” then go to “Turn Windows features on or off” and then check “Microsoft Message Queue” Server

2. Check in the Services (services.msc), it will install “Message Queuing” service and “Net.Msmq Listener Adapter” and it should be automatically started once you have installed it

3. Make sure that these ports are not blocked by your firewall because MSMQ are using this ports

TCP: 1801
RPC: 135, 2101*, 2103*, 2105*
UDP: 3527, 1801

Basic Operation

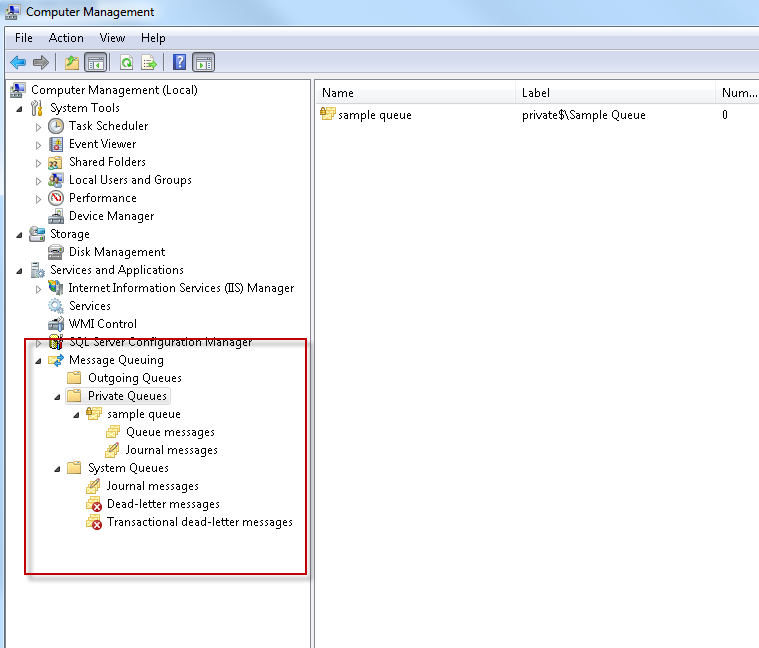
1. in order to see your queue, you can go to “computer management – right click my computer and select manage”. Go to Services and Applications node and there will be a sub node called as “Message Queuing”

2. From this console, you can see all the messages that you want to see

3. in my presentation slides there are definitions of private queues and public queues or you can get more detail from MSDN.

4. For this tutorial, please create a private queue called as “Sample Queue” by right clicking the private queue and select “Add”

Coding tutorial

*Please import System.Messaging

1. How to send a message into a queue

Code Snippet
  1. private const string MESSAGE_QUEUE = @”.\Private$\Sample Queue”;
  2.         private MessageQueue _queue;
  3.         private void SendMessage(string message)
  4.         {
  5.             _queue = new MessageQueue(MESSAGE_QUEUE);
  6.             Message msg = new Message();
  7.             msg.Body = message;
  8.             msg.Label = “Presentation at “ + DateTime.Now.ToString();
  9.             _queue.Send(msg);
  10.             lblError.Text = “Message already sent”;
  11.         }

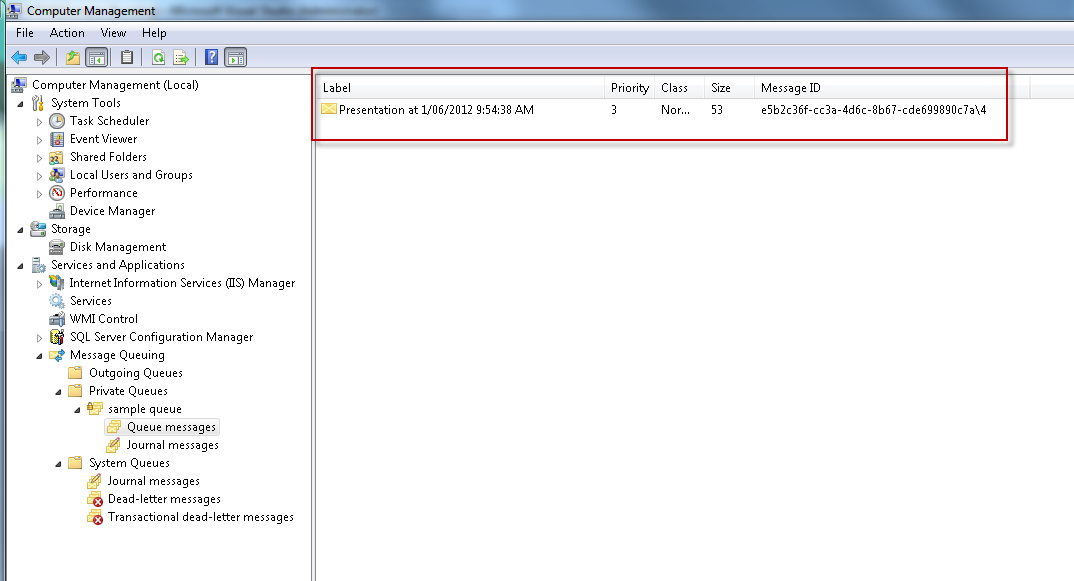
2. Check the queue through MMC console – right click and select refresh

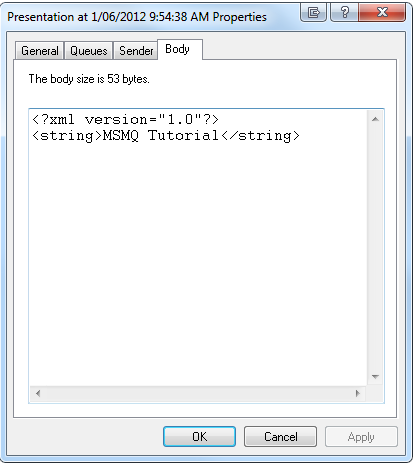
2. Right click on the message and go to Body then you can see that the message is being stored as XML

3. How to process the queue?See the code snippet below

Code Snippet
  1. private const string MESSAGE_QUEUE = @”.\Private$\Sample Queue”;
  2.         private static void CheckMessage()
  3.         {
  4.             try
  5.             {
  6.                 var queue = new MessageQueue(MESSAGE_QUEUE);
  7.                 var message = queue.Receive(new TimeSpan(0, 0, 1));
  8.                 message.Formatter = new XmlMessageFormatter(
  9.                                     new String[] { “System.String,mscorlib” });
  10.                 Console.WriteLine(message.Body.ToString());
  11.             }
  12.             catch(Exception ex)
  13.             {
  14.                 Console.WriteLine(“No Message”);
  15.             }
  16.         }

Queue.Receive is a synchronous process and by passing the timespan into the function, meaning that it will throw exception of Timeout if it hasn’t received any within the duration specified

-The formatter is used to cast back to the original type

-Then you can collect the message by using “Message.Body”

-Once it’s done the message will be removed from your queue

Conclusion

Pros:

Ready to be used – It provides simple queuing for your application without you need to recreate one/reinvent the wheel

Interoperability – It allows other application to collect/process the message from MSMQ

Cons:

-Message poisoning can happen (when a message cannot be process and blocks entire queue)
-Message and queues are in proprietary format which cannot be edited directly
-The only tool is MMC administration console, or you can buy QueueExplorer (3rd party software
)

My Slides:

http://portal.sliderocket.com/vmware/MSMQ-Microsoft-Message-Queue

*DISCLAIMER:this tutorial does not represent the company that I’m working for in any way. This is just a tutorial that I created personally


Log4Net – Logging for .NET

Before I was thinking of rewriting my own logging for my application but after having a careful thought, I decided just to get one from NuGet package instead of reinventing the wheel. I heard a lot about Log4Net and decided to try that out. It’s really simple to get this logging up and running on your application

This is what you need to do:

1. install Log4Net from NuGet

2. Modify your web.config to add a new section and new configuration – In this case, I decided to use FileLogger. but you can have different type logger if you want (e.g event log, console, etc) or you can even build your own one that implemented ILog, this configuration allow you to create a new log file when the log file already reached the limit

Code Snippet
  1. <configSections>
  2.     <section name=log4nettype=log4net.Config.Log4NetConfigurationSectionHandler, log4net />
  3.   </configSections>
  4.   <log4net>
  5.     <root>
  6.       <levelvalue=DEBUG />
  7.       <appender-ref ref=LogFileAppender />
  8.     </root>
  9.     <appender name=LogFileAppender type=log4net.Appender.RollingFileAppender >
  10.       <param name=Filevalue=C:\\log.txt />
  11.       <param name=AppendToFilevalue=true />
  12.       <rollingStyle value=Size />
  13.       <maxSizeRollBackups value=10 />
  14.       <maximumFileSize value=10MB />
  15.       <staticLogFileName value=true />
  16.       <layout type=log4net.Layout.PatternLayout>
  17.         <param name=ConversionPattern value=%-5p%d{yyyy-MM-dd hh:mm:ss} – %m%n />
  18.       </layout>
  19.     </appender>
  20.   </log4net>

3. Code implementation – in this case I decided to register it in my global container and retrieve it later. You need to call log4net.Config.XmlConfigurator.Configure in order for Log4Net to get the settings from web.config – This is very important otherwise you will find that there is no log being generated

Code Snippet
  1. protected void Application_Start()
  2.         {
  3.             AreaRegistration.RegisterAllAreas();
  4.             RegisterGlobalFilters(GlobalFilters.Filters);
  5.             RegisterRoutes(RouteTable.Routes);
  6.             BundleTable.Bundles.RegisterTemplateBundles();
  7.             RegisterDependency();
  8.         }
  9.         #region “Dependency Injection”
  10.         private static Container Container;
  11.         public static T GetInstance<T>() where T : class
  12.         {
  13.             return Container.GetInstance<T>();
  14.         }
  15.         protected void RegisterDependency()
  16.         {
  17.             //Create a main containers
  18.             var container = new Container();
  19.             // 2. Configure the container (register)
  20.             container.RegisterPerWebRequest<IUnitOfWork>(() => new UnitOfWork(new PosDataContext()));
  21.             //Register logger
  22.             log4net.Config.XmlConfigurator.Configure();
  23.             container.Register<ILog>(() => log4net.LogManager.GetLogger(typeof(MvcApplication)));
  24.             container.Verify();
  25.             Container = container;
  26.         }
  27.         #endregion

calling the logger from my code (controller in this context)

Code Snippet
  1. public ActionResult Index()
  2.         {
  3.             ViewBag.Message = “Menu”;
  4.             MvcApplication.GetInstance<ILog>().Info(“Test Info”);
  5.             MvcApplication.GetInstance<ILog>().Error(“Test Error”);
  6.             MvcApplication.GetInstance<ILog>().Debug(“Test Debug”);
  7.             return View();
  8.         }

PS: if you want to implement your own logger, then I’d recommend you to have your logger to implement ILog interface and change it through web.config but don’t wrap/call Log4Net inside your custom logger because you don’t want to limit the rich functionality of Log4Net with your custom logger

Another tips, is when you started to add logging in your application then there should be some performance overhead eventhough it is minor. In the example below MyFunctionOutput function will still be called eventhough you disabled the logging on the config, in order to make sure the debugging code only executed

Code Snippet
  1. MvcApplication.GetInstance<ILog>().Debug(“My Function Output:” + MyFunctionOutput());

When you want to have the debug/logging omitting the log whenever the logging is enabled then you can wrap around the logging with this property (there are another properties IsErrorEnabled, IsInfoEnabled, etc)

Code Snippet
  1. if (MvcApplication.GetInstance<ILog>().IsDebugEnabled)
  2.             {
  3.                 MvcApplication.GetInstance<ILog>().Debug(“My Function Output:” + MyFunctionOutput());
  4.             }

Dependency Injection using Simple Injector Tutorial

This is a simple tutorial in how to use Dependency Injection using SimpleInjector (You can get this package from NuGet)

In this case, I use SimpleInjector to manage my Data Context – I want my Data Context to be per request (Unit of Work per request). The concept of this dependency Injection is to have a global container where you can resolve your object from

1. Create an extension method to the Simple Injector

Code Snippet
  1. using System;
  2. using System.Collections.Generic;
  3. using System.Linq;
  4. using System.Web;
  5. using SimpleInjector;
  6. using System.Diagnostics;
  7. using System.Linq.Expressions;
  8. ///<summary>
  9. /// Extension methods for registering types on a per web request basis.
  10. ///</summary>
  11. public static partial class SimpleInjectorPerWebRequestExtensions
  12. {
  13.     [DebuggerStepThrough]
  14.     public static void RegisterPerWebRequest<TService, TImplementation>(
  15.         this Container container)
  16.         where TService : class
  17.         where TImplementation : class, TService
  18.     {
  19.         Func<TService> instanceCreator =
  20.             () => container.GetInstance<TImplementation>();
  21.         container.RegisterPerWebRequest<TService>(instanceCreator);
  22.     }
  23.     [DebuggerStepThrough]
  24.     public static void RegisterPerWebRequest<TService>(
  25.         this Container container,
  26.         Func<TService> instanceCreator) where TService : class
  27.     {
  28.         var creator =
  29.             new PerWebRequestInstanceCreator<TService>(instanceCreator);
  30.         container.Register<TService>(creator.GetInstance);
  31.     }
  32.     [DebuggerStepThrough]
  33.     public static void RegisterPerWebRequest<TConcrete>(this Container container)
  34.         where TConcrete : class
  35.     {
  36.         container.Register<TConcrete>();
  37.         container.ExpressionBuilt += (sender, e) =>
  38.         {
  39.             if (e.RegisteredServiceType == typeof(TConcrete))
  40.             {
  41.                 var transientInstanceCreator = Expression.Lambda<Func<TConcrete>>(
  42.                     e.Expression, new ParameterExpression[0]).Compile();
  43.                 var creator = new PerWebRequestInstanceCreator<TConcrete>(
  44.                     transientInstanceCreator);
  45.                 e.Expression = Expression.Call(Expression.Constant(creator),
  46.                     creator.GetType().GetMethod(“GetInstance”));
  47.             }
  48.         };
  49.     }
  50.     [DebuggerStepThrough]
  51.     public static void DisposeInstance<TService>() where TService : class
  52.     {
  53.         object key = typeof(PerWebRequestInstanceCreator<TService>);
  54.         var instance = HttpContext.Current.Items[key] as IDisposable;
  55.         if (instance != null)
  56.         {
  57.             instance.Dispose();
  58.         }
  59.     }
  60.     private sealed class PerWebRequestInstanceCreator<T> where T : class
  61.     {
  62.         private readonly Func<T> instanceCreator;
  63.         internal PerWebRequestInstanceCreator(Func<T> instanceCreator)
  64.         {
  65.             this.instanceCreator = instanceCreator;
  66.         }
  67.         [DebuggerStepThrough]
  68.         public T GetInstance()
  69.         {
  70.             var context = HttpContext.Current;
  71.             if (context == null)
  72.             {
  73.                 // No HttpContext: Let’s create a transient object.
  74.                 return this.instanceCreator();
  75.             }
  76.             object key = this.GetType();
  77.             T instance = (T)context.Items[key];
  78.             if (instance == null)
  79.             {
  80.                 context.Items[key] = instance = this.instanceCreator();
  81.             }
  82.             return instance;
  83.         }
  84.     }
  85. }

2. Modify Global.asax – The class name will be MvcApplication in MVC Project

Code Snippet
  1. #region “Dependency Injection”
  2.         private static Container Container;
  3.         public static T GetInstance<T>() where T : class
  4.         {
  5.             return Container.GetInstance<T>();
  6.         }
  7.         protected void RegisterDependency()
  8.         {
  9.             //Create a main containers
  10.             var container = new Container();
  11.             // 2. Configure the container (register)
  12.             container.RegisterPerWebRequest<IUnitOfWork>(() => new UnitOfWork(new PosDataContext()));
  13.             container.Register<ITableRepository, TableRepository>();
  14.             container.Verify();
  15.             Container = container;
  16.         }
  17.         #endregion
  18.         protected void Application_Start()
  19.         {
  20.             AreaRegistration.RegisterAllAreas();
  21.             RegisterGlobalFilters(GlobalFilters.Filters);
  22.             RegisterRoutes(RouteTable.Routes);
  23.             BundleTable.Bundles.RegisterTemplateBundles();
  24.             RegisterDependency();
  25.         }
  26.         protected void Application_EndRequest(object src, EventArgs e)
  27.         {
  28.             ServiceStack.MiniProfiler.Profiler.Stop();
  29.             SimpleInjectorPerWebRequestExtensions.DisposeInstance<IUnitOfWork>();
  30.         }

3. Consume it from the controller – Call the container in the Global.asax to resolve the object (GetInstance function)

Code Snippet
  1. public ActionResult Index()
  2.         {
  3.             ViewBag.Title = “Tables”;
  4.             return View(MvcApplication.GetInstance<IUnitOfWork>().TableRepository.Get(e => e.Active));
  5.         }

IoC Container Benchmarks

I found this benchmark for different IoC in .NET. Personally I’ve been using Unity, Ninject and SimpleInjector. I like SimpleInjector because it is very simple and surprisingly it is quite fast compared with the rest. Performance is just one of the aspect of IoC but it doesn’t always mean everything

http://www.palmmedia.de/Blog/2011/8/30/ioc-container-benchmark-performance-comparison

http://www.iocbattle.com/

How to Debug WCF Service Issue?

1. Change the app.config/web.config of your application that calls the WCF service by adding System.diagnostics detail as below

Code Snippet
  1. <system.diagnostics>
  2.     <sources>
  3.       <source name=System.ServiceModel switchValue=Verbose,ActivityTracing propagateActivity=true>
  4.         <listeners>
  5.           <add type=System.Diagnostics.DefaultTraceListenername=Default>
  6.             <filter type=“” />
  7.           </add>
  8.           <add name=ServiceModelTraceListener>
  9.             <filter type=“” />
  10.           </add>
  11.         </listeners>
  12.       </source>
  13.       <source name=System.ServiceModel.MessageLogging switchValue=Verbose,ActivityTracing>
  14.         <listeners>
  15.           <add type=System.Diagnostics.DefaultTraceListenername=Default>
  16.             <filter type=“” />
  17.           </add>
  18.           <add name=ServiceModelMessageLoggingListener>
  19.             <filter type=“” />
  20.           </add>
  21.         </listeners>
  22.       </source>
  23.     </sources>
  24.     <sharedListeners>
  25.       <add initializeData=MyWCFTraceLog.svclog
  26.       type=System.Diagnostics.XmlWriterTraceListener, System, Version=2.0.0.0, Culture=neutral, PublicKeyToken=b77a5c561934e089
  27.       name=ServiceModelTraceListenertraceOutputOptions=Timestamp>
  28.         <filter type=“” />
  29.       </add>
  30.       <add initializeData=MyWCFTraceLog.svclog
  31.           type=System.Diagnostics.XmlWriterTraceListener, System, Version=2.0.0.0, Culture=neutral, PublicKeyToken=b77a5c561934e089
  32.           name=ServiceModelMessageLoggingListenertraceOutputOptions=Timestamp>
  33.         <filter type=“” />
  34.       </add>
  35.     </sharedListeners>
  36.     <trace autoflush=true />
  37.   </system.diagnostics>

2. Run your application as usual until it throws the error or until the stage where you can reproduce your issue, once you are done, quit your application or take out the diagnostics section from the config file straight away so your log will not be growing too quickly/massively

3. The log file will be called as MyWCFTraceLog.svclog (as we define in the config file) and it will be located on the same folder as the executable – normally it is in the bin folder

4. How to open svclog file? Go to your program files (x86) or program files/Microsoft SDKs/Windows/v7.0A/Bin/SvcTraceViewer.exe

5. SVCTraceViewer will display you the story line of your WCF and it will help you to pinpoint the underlying issue

Umbraco Installation in Shared Web Hosting

I tried to install umbraco in shared webhosting from the control panel but instead the error that I’m getting is

The application could not be installed: Error occured in Web App Gallery module

From my research it seems that there is an error in the Web App Gallery module, some article it says that the Web App Gallery module is out of date. But this is shared web hosting so there is nothing much I can do to fix this. So how to install umbraco manually?

1. Create a blank DB in your SQL Server 2008 for your Umbraco

2. Create a SQL User for the Umbraco DB in the step 1

3. Download umbraco from http://umbraco.codeplex.com

4. Extract the content to the downloaded package to the root of your domain wwwroot folder via FTP

5. Make sure the default website is already created

6. Make sure the .NET framework is being set to .NET 4.0 (Integrated)

7. Run the installation through www.yourdomain.com/install/default.aspx

8. Follow the steps, it will ask you the database name and the database user along the way

9. Once the installation finished, please make sure you delete the install folder for security purpose

Cleanup File name from invalid characters

I have a function that is used to save a file base on the user input (basically the user can type whichever filename and whichever path) and the code is not handling the invalid filename or path hence what it does is just throwing .NET general exception like below

To fix it I created a new function that basically get the invalid path characters and invalid filename characters from the system and remove invalid character in the input (file name). By doing this the user does not need to replace the character.

If you use Path.GetFileName it will actually remove the illegal character automatically but the way it removes the illegal character is so aggressive

e.g Path.GetFileName(“c:\workflow\Clearance:Photo ID Badge:Access abc-123.ist”) will return Access abc-123.ist

Well this problem itself will give different argument like why do we let people put the garbage character in?and why don’t we give the validation?or the other argument is “why do we need to change the input from the user without letting them knowing it?

  236    ”’ <summary>

237     ”’ this function is used to clean up invalid/illegal characters from filename and replace it with blank

238     ”’ </summary>

239     ”’ <param name=”FileName”></param>

240     ”’ <returns></returns>

241     ”’ <remarks></remarks>

242     Private Function CleanFileName(ByVal FileName As String) As String

243         Dim invalid As String = New String(Path.GetInvalidFileNameChars()) + New String(Path.GetInvalidPathChars())

244         Dim originalPath As String = FileName.Substring(0, FileName.LastIndexOf(“\”) + 1)

245         FileName = FileName.Substring(FileName.LastIndexOf(“\”))

246

247         For Each c As Char In invalid

248             FileName = FileName.Replace(c.ToString(), “”)

249         Next

250

251         ‘readd the path

252         FileName = originalPath + FileName

253

254         Return FileName

255     End Function