Technical Insights: Azure, .NET, Dynamics 365 & EV Charging Architecture

Category: Microsoft Azure

Azure Service Bus Peek-Lock: A Comprehensive Guide to Reliable Message Processing

Working with Peek-Lock in Azure Service Bus: A Practical Guide

In many distributed systems, reliable message handling is a top priority. When I first started building an order processing application, I learned very quickly that losing even one message could cause major headaches. That’s exactly where Azure Service Bus and its Peek-Lock mode came to the rescue. By using Peek-Lock, you don’t remove the message from the queue as soon as you receive it. Instead, you lock it for a certain period, process it, and then decide what to do next—complete, abandon, dead-letter, or defer. Here’s how it all fits together.

Why Peek-Lock Matters

Peek-Lock is one of the two receiving modes offered by Azure Service Bus. The other is Receive and Delete, which automatically removes messages from the queue upon receipt. While that might be fine for scenarios where occasional message loss is acceptable, many real-world applications need stronger guarantees.

  1. Reliability: With Peek-Lock, if processing fails, you can abandon the message. This makes it visible again for another attempt, reducing the risk of data loss.
  2. Explicit Control: You decide when a message is removed. After you successfully handle the message (e.g., update a database or complete a transaction), you explicitly mark it as complete.
  3. Error Handling: If the same message repeatedly fails, you can dead-letter it for investigation. This helps avoid getting stuck in an endless processing loop.

What Happens If the Lock Expires?

By default, the lock is held for a certain period (often 30 seconds, which can be adjusted). If your code doesn’t complete or abandon the message before the lock expires, the message becomes visible to other receivers. To handle potentially lengthy processes, you can renew the lock programmatically, although that introduces additional complexity. The key takeaway is that you should design your service to either complete or abandon messages quickly, or renew the lock if more time is truly necessary.

Default Peek-Lock in Azure Functions

When you use Azure Service Bus triggers in Azure Functions, you generally don’t need to configure or manage the Peek-Lock behavior yourself. According to the official documentation, the default behavior in Azure Functions is already set to Peek-Lock. This means you can focus on your function’s core logic without explicitly dealing with message locking or completion in most scenarios.

Don’t Swallow Exceptions

One important detail to note is that in Azure Functions, any unhandled exceptions in your function code will signal to the runtime that message processing failed. This prevents the function from automatically completing the message, allowing the Service Bus to retry later. However, if you wrap your logic in a try/catch block and inadvertently swallow the exception—meaning you catch the error without rethrowing or handling it properly—you might unintentionally signal success. That would lead to the message being completed even though a downstream service might have failed.

Recommendation:

  • If you must use a try/catch, make sure errors are re-thrown or handled in a way that indicates failure if the message truly hasn’t been processed successfully. Otherwise, you’ll end up completing the message and losing valuable information about the error.

Typical Use Cases

  1. Financial Transactions: Losing a message that represents a monetary transaction is not an option. Peek-Lock ensures messages remain available until your code confirms it was successfully processed.
  2. Critical Notifications: If you have an alerting system that notifies users about important events, you don’t want those notifications disappearing in case of a crash.
  3. Order Processing: In ecommerce or supply chain scenarios, every order message has to be accounted for. Peek-Lock helps avoid partial or lost orders due to transient errors.

Example in C#

Here’s a short snippet that demonstrates how you can receive messages in Peek-Lock mode using the Azure.Messaging.ServiceBus library:

using System;
using System.Threading.Tasks;
using Azure.Messaging.ServiceBus;

public class PeekLockExample
{
    private const string ConnectionString = "<YOUR_SERVICE_BUS_CONNECTION_STRING>";
    private const string QueueName = "<YOUR_QUEUE_NAME>";

    public async Task RunPeekLockSample()
    {
        // Create a Service Bus client
        var client = new ServiceBusClient(ConnectionString);

        // Create a receiver in Peek-Lock mode
        var receiver = client.CreateReceiver(
            QueueName, 
            new ServiceBusReceiverOptions 
            { 
                ReceiveMode = ServiceBusReceiveMode.PeekLock 
            }
        );

        try
        {
            // Attempt to receive a single message
            ServiceBusReceivedMessage message = await receiver.ReceiveMessageAsync(TimeSpan.FromSeconds(10));

            if (message != null)
            {
                // Process the message
                string body = message.Body.ToString();
                Console.WriteLine($"Processing message: {body}");

                // If processing is successful, complete the message
                await receiver.CompleteMessageAsync(message);
                Console.WriteLine("Message completed and removed from the queue.");
            }
            else
            {
                Console.WriteLine("No messages were available to receive.");
            }
        }
        catch (Exception ex)
        {
            Console.WriteLine($"An error occurred: {ex.Message}");
            // Optionally handle or log the exception
        }
        finally
        {
            // Clean up resources
            await receiver.CloseAsync();
            await client.DisposeAsync();
        }
    }
}

What’s Happening Here?

  • We create a ServiceBusClient to connect to Azure Service Bus.
  • We specify ServiceBusReceiveMode.PeekLock when creating the receiver.
  • The code then attempts to receive one message and processes it.
  • If everything goes smoothly, we call CompleteMessageAsync to remove it from the queue. If something goes wrong, the message remains locked until the lock expires or until we choose to abandon it.

Final Thoughts

Peek-Lock strikes a balance between reliability and performance. It ensures you won’t lose critical data while giving you the flexibility to handle errors gracefully. Whether you’re dealing with financial operations, critical user notifications, or any scenario where each message must be processed correctly, Peek-Lock is an indispensable tool in your Azure Service Bus arsenal.

In Azure Functions, you get this benefit without having to manage the locking details, so long as you don’t accidentally swallow your exceptions. For other applications, adopting Peek-Lock might demand a bit more coding, but it’s well worth it if you need guaranteed, at-least-once message delivery.

Whether you’re building a simple queue-based workflow or a complex event-driven system, Peek-Lock ensures your messages remain safe until you decide they’re processed successfully. It’s a powerful approach that balances performance with reliability, which is why it’s a must-know feature for developers relying on Azure Service Bus.

Microsoft Azure Service Bus Exception: “Cannot allocate more handles. The maximum number of handles is 4999”

When working with Microsoft Azure Service Bus, you may encounter the following exception:

“Cannot allocate more handles. The maximum number of handles is 4999.”

This issue typically arises due to improper dependency injection scope configuration for the ServiceBusClient. In most cases, the ServiceBusClient is registered as Scoped instead of Singleton, leading to the creation of multiple instances during the application lifetime, which exhausts the available handles.

In this blog post, we’ll explore the root cause and demonstrate how to fix this issue by using proper dependency injection in .NET applications.

Understanding the Problem

Scoped vs. Singleton

  1. Scoped: A new instance of the service is created per request.
  2. Singleton: A single instance of the service is shared across the entire application lifetime.

The ServiceBusClient is designed to be a heavyweight object that maintains connections and manages resources efficiently. Hence, it should be registered as a Singleton to avoid excessive resource allocation and ensure optimal performance.

Before Fix: Using Scoped Registration

Here’s an example of the problematic configuration:

public void ConfigureServices(IServiceCollection services)
{
    services.AddScoped(serviceProvider =>
    {
        string connectionString = Configuration.GetConnectionString("ServiceBus");
        return new ServiceBusClient(connectionString);
    });

    services.AddScoped<IMessageProcessor, MessageProcessor>();
}

In this configuration:

  • A new instance of ServiceBusClient is created for each HTTP request or scoped context.
  • This quickly leads to resource exhaustion, causing the “Cannot allocate more handles” error.

Solution: Switching to Singleton

To fix this, register the ServiceBusClient as a Singleton, ensuring a single instance is shared across the application lifetime:

public void ConfigureServices(IServiceCollection services)
{
    services.AddSingleton(serviceProvider =>
    {
        string connectionString = Configuration.GetConnectionString("ServiceBus");
        return new ServiceBusClient(connectionString);
    });

    services.AddScoped<IMessageProcessor, MessageProcessor>();
}

In this configuration:

  • A single instance of ServiceBusClient is created and reused for all requests.
  • Resource usage is optimized, and the exception is avoided.

Sample Code: Before and After

Before Fix (Scoped Registration)

public interface IMessageProcessor
{
    Task ProcessMessageAsync();
}

public class MessageProcessor : IMessageProcessor
{
    private readonly ServiceBusClient _client;

    public MessageProcessor(ServiceBusClient client)
    {
        _client = client;
    }

    public async Task ProcessMessageAsync()
    {
        ServiceBusReceiver receiver = _client.CreateReceiver("queue-name");
        var message = await receiver.ReceiveMessageAsync();
        Console.WriteLine($"Received message: {message.Body}");
        await receiver.CompleteMessageAsync(message);
    }
}

After Fix (Singleton Registration)

public void ConfigureServices(IServiceCollection services)
{
    // Singleton registration for ServiceBusClient
    services.AddSingleton(serviceProvider =>
    {
        string connectionString = Configuration.GetConnectionString("ServiceBus");
        return new ServiceBusClient(connectionString);
    });

    services.AddScoped<IMessageProcessor, MessageProcessor>();
}

public class MessageProcessor : IMessageProcessor
{
    private readonly ServiceBusClient _client;

    public MessageProcessor(ServiceBusClient client)
    {
        _client = client;
    }

    public async Task ProcessMessageAsync()
    {
        ServiceBusReceiver receiver = _client.CreateReceiver("queue-name");
        var message = await receiver.ReceiveMessageAsync();
        Console.WriteLine($"Received message: {message.Body}");
        await receiver.CompleteMessageAsync(message);
    }
}

Key Takeaways

  1. Always use Singleton scope for ServiceBusClient to optimize resource usage.
  2. Avoid using Scoped or Transient scope for long-lived, resource-heavy objects.
  3. Test your application under load to ensure no resource leakage occurs.

Mastering Feature Flag Management with Azure Feature Manager

In the dynamic realm of software development, the power to adapt and refine your application’s features in real-time is a game-changer. Azure Feature Manager emerges as a potent tool in this scenario, empowering developers to effortlessly toggle features on or off directly from the cloud. This comprehensive guide delves into how Azure Feature Manager can revolutionize your feature flag control, enabling seamless feature introduction, rollback capabilities, A/B testing, and tailored user experiences.

Introduction to Azure Feature Manager

Azure Feature Manager is a sophisticated component of Azure App Configuration. It offers a unified platform for managing feature flags across various environments and applications. Its capabilities extend to gradual feature rollouts, audience targeting, and seamless integration with Azure Active Directory for enhanced access control.

Step-by-Step Guide to Azure App Configuration Setup

Initiating your journey with Azure Feature Manager begins with setting up an Azure App Configuration store. Follow these steps for a smooth setup:

  1. Create Your Azure App Configuration: Navigate to the Azure portal and initiate a new Azure App Configuration resource. Fill in the required details and proceed with creation.
  2. Secure Your Access Keys: Post-creation, access the “Access keys” section under your resource settings to retrieve the connection strings, crucial for your application’s connection to the Azure App Configuration.

Crafting Feature Flags

To leverage feature flags in your application:

  1. Within the Azure App Configuration resource, click on “Feature Manager” and then “+ Add” to introduce a new feature flag.
  2. Identify Your Feature Flag: Name it thoughtfully, as this identifier will be used within your application to assess the flag’s status

Application Integration Essentials

Installing Required NuGet Packages

Your application necessitates specific packages for Azure integration:

  • Microsoft.Extensions.Configuration.AzureAppConfiguration
  • Microsoft.FeatureManagement.AspNetCore

These can be added via your IDE or through the command line in your project directory:

dotnet add package Microsoft.Extensions.Configuration.AzureAppConfiguration
dotnet add package Microsoft.FeatureManagement.AspNetCore

Application Configuration

Modify your appsettings.json to include your Azure App Configuration connection string:

{
  "ConnectionStrings": {
    "AppConfig": "Endpoint=https://<your-resource-name>.azconfig.io;Id=<id>;Secret=<secret>"
  }
}

Further, in Program.cs (or Startup.cs for earlier .NET versions), ensure your application is configured to utilize Azure App Configuration and activate feature management:

var builder = WebApplication.CreateBuilder(args);

builder.Configuration.AddAzureAppConfiguration(options =>
{
    options.Connect(builder.Configuration["ConnectionStrings:AppConfig"])
           .UseFeatureFlags();
});

builder.Services.AddFeatureManagement();

Implementing Feature Flags

To verify a feature flag’s status within your code:

using Microsoft.FeatureManagement;

public class FeatureService
{
    private readonly IFeatureManager _featureManager;

    public FeatureService(IFeatureManager featureManager)
    {
        _featureManager = featureManager;
    }

    public async Task<bool> IsFeatureActive(string featureName)
    {
        return await _featureManager.IsEnabledAsync(featureName);
    }
}

Advanced Implementation: Custom Targeting Filter

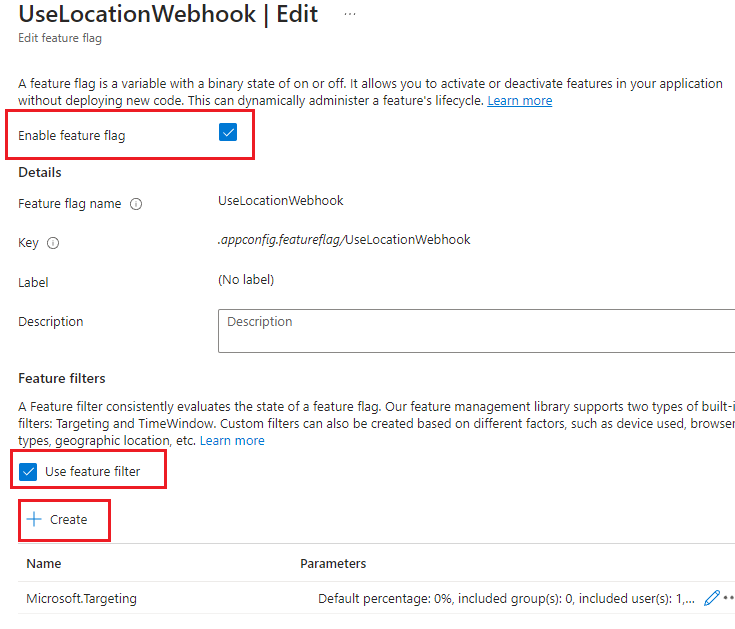
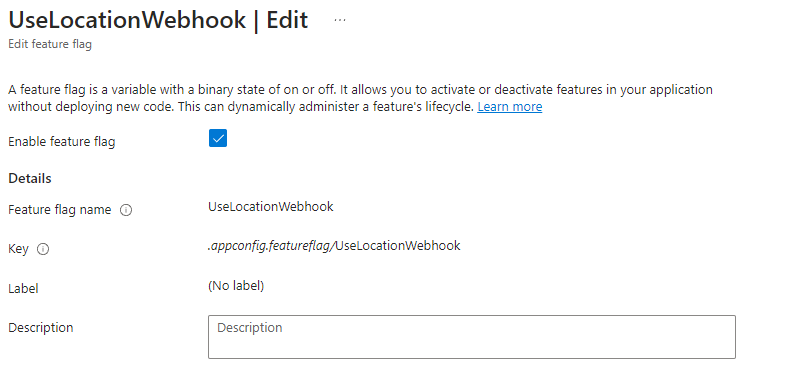
Go to Azure and modify your feature flag

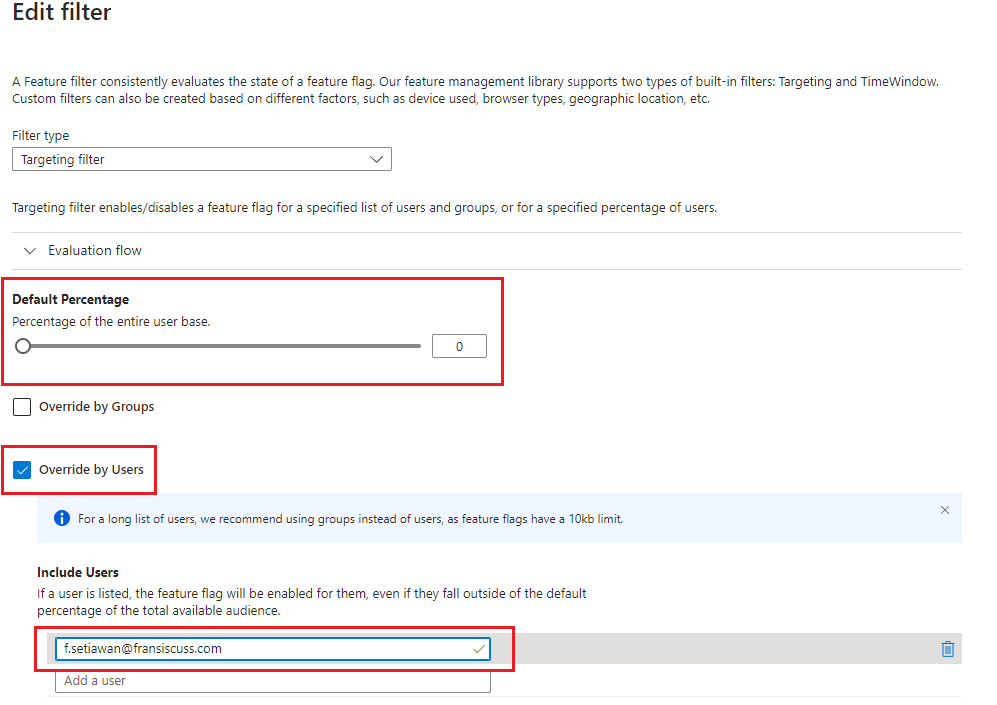
Make sure the “Default Percentage” is set to 0 and in this scenario we want to target specific user based on its email address

For user or group-specific targeting, We need to implement ITargetingContextAccessor. In below example we target based on its email address where the email address comes from JWT

using Microsoft.FeatureManagement.FeatureFilters;
using System.Security.Claims;

namespace SampleApp
{
    public class B2CTargetingContextAccessor : ITargetingContextAccessor
    {
        private const string TargetingContextLookup = "B2CTargetingContextAccessor.TargetingContext";
        private readonly IHttpContextAccessor _httpContextAccessor;

        public B2CTargetingContextAccessor(IHttpContextAccessor httpContextAccessor)
        {
            _httpContextAccessor = httpContextAccessor;
        }

        public ValueTask<TargetingContext> GetContextAsync()
        {
            HttpContext httpContext = _httpContextAccessor.HttpContext;

            //
            // Try cache lookup
            if (httpContext.Items.TryGetValue(TargetingContextLookup, out object value))
            {
                return new ValueTask<TargetingContext>((TargetingContext)value);
            }

            ClaimsPrincipal user = httpContext.User;

            //
            // Build targeting context based off user info
            TargetingContext targetingContext = new TargetingContext
            {
                UserId = user.FindFirst("http://schemas.xmlsoap.org/ws/2005/05/identity/claims/emailaddress")?.Value,
                Groups = new string[] { }
            };

            //
            // Cache for subsequent lookup
            httpContext.Items[TargetingContextLookup] = targetingContext;

            return new ValueTask<TargetingContext>(targetingContext);
        }
    }
}

in Program.cs (or Startup.cs for earlier .NET versions), modify your Feature Management to use targeting filter

    builder.Services.AddFeatureManagement().WithTargeting<B2CTargetingContextAccessor>();

You also need to pass the targeting context to the feature manager

using Microsoft.FeatureManagement;

public class FeatureService
{
    private readonly IFeatureManager _featureManager;
    private readonly ITargetingContextAccessor _targetContextAccessor;

    public FeatureService(IFeatureManager featureManager, ITargetingContextAccessor targetingContextAccessor)
    {
        _featureManager = featureManager;
_targetContextAccessor = targetingContextAccessor;
    }

    public async Task<bool> IsFeatureActive()
    {
        return await _featureManager.IsEnabledAsync("UseLocationWebhook", _targetContextAccessor);
    }
}

Read and remove scheduled message in Azure Service Bus

Ever wondered on how you can remove the scheduled message in Service bus topic or queue? We had a bug where one of our service keep queuing the messages while its not meant to be queued and we deployed the fix but in order to test the fix we need to make sure there are no messages are being scheduled therefore we need to remove all scheduled messages to test if the fix is working

At the same time you can also use the same code to check your messages if it is all being scheduled properly based on your logic

I was expecting the service bus explorer on azure portal allow us to peek into this scheduled messages but unfortunately it doesn’t have this feature

for service bus topic you can use below code

class Program
    {

        // Connection String for the namespace can be obtained from the Azure portal under the
        // 'Shared Access policies' section.
        const string ServiceBusConnectionString = "[Servicebus connection string with entity path]";
        static ITopicClient topicClient;
        static IMessageReceiver messageReceiver;

        static void Main(string[] args)

        {
            MainAsync().GetAwaiter().GetResult();
        }

        static async Task MainAsync()
        {
            var sbConnStringBuilder = new ServiceBusConnectionStringBuilder(ServiceBusConnectionString);
            topicClient = new TopicClient(sbConnStringBuilder);
            Console.WriteLine("======================================================");
            Console.WriteLine("Press any key to exit..");
            Console.WriteLine("======================================================");

            messageReceiver = new MessageReceiver(sbConnStringBuilder);

            Message message = await messageReceiver.PeekAsync();

            // Message with property ScheduledEnqueueTimeUtc not null means it is a scheduled message

            while (message != null)
            {
                if (message != null && message.ScheduledEnqueueTimeUtc != null)
                {
                    // Remove the scheduled message
                    await topicClient.CancelScheduledMessageAsync(message.SystemProperties.SequenceNumber);
                }
                message = await messageReceiver.PeekAsync();
            }

            Console.ReadKey();
            await topicClient.CloseAsync();
        }

    }

For the service bus queue you can use code below

class Program
    {

        // Connection String for the namespace can be obtained from the Azure portal under the
        // 'Shared Access policies' section.
        const string ServiceBusConnectionString = "[Servicebus connection string with entity path]";
        static IQueueClient queueClient;
        static IMessageReceiver messageReceiver;

        static void Main(string[] args)

        {
            MainAsync().GetAwaiter().GetResult();
        }

        static async Task MainAsync()
        {
            var sbConnStringBuilder = new ServiceBusConnectionStringBuilder(ServiceBusConnectionString);
            queueClient = new QueueClient(sbConnStringBuilder);
            Console.WriteLine("======================================================");
            Console.WriteLine("Press any key to exit..");
            Console.WriteLine("======================================================");

            messageReceiver = new MessageReceiver(sbConnStringBuilder);

            Message message = await messageReceiver.PeekAsync();

            // Message with property ScheduledEnqueueTimeUtc not null means it is a scheduled message

            while (message != null)
            {
                if (message != null && message.ScheduledEnqueueTimeUtc != null)
                {
                    // Remove the scheduled message
                    await queueClient.CancelScheduledMessageAsync(message.SystemProperties.SequenceNumber);
                }
                message = await messageReceiver.PeekAsync();
            }

            Console.ReadKey();
            await queueClient.CloseAsync();
        }

Powered by WordPress & Theme by Anders Norén