Technical Insights: Azure, .NET, Dynamics 365 & EV Charging Architecture

Tag: ai

How I Set Up My AI Development Environment in WSL on Windows with an RTX 5070 Ti

Introduction

Over the past few weeks, I’ve been diving into AI model training and inference using open-source GPT-style models. I wanted a setup that could take advantage of my NVIDIA RTX 5070 Ti for faster experimentation, but still run inside WSL (Windows Subsystem for Linux) for maximum compatibility with Linux-based tools.

After a bit of trial and error — and a couple of GPU compatibility hurdles — I now have a fully working environment that runs Hugging Face models directly on my GPU. Here’s exactly how I did it.

1. Installing WSL and Preparing Ubuntu

I started by making sure WSL2 was installed and running an Ubuntu distribution:

wsl --install -d Ubuntu
wsl --set-default-version 2

Then I launched Ubuntu from the Start Menu, created my user, and updated everything:

sudo apt update && sudo apt -y upgrade

2. Enabling GPU Support in WSL

Since I wanted GPU acceleration, I installed the latest NVIDIA Game Ready/Studio Driver for Windows. This is important because WSL uses the Windows driver to expose the GPU inside Linux.

Inside WSL, I checked GPU visibility:

nvidia-smi

If you see your GPU listed, you’re good to go.

3. Installing Micromamba for Environment Management

I like to keep my AI experiments isolated in separate environments, so I use micromamba (a lightweight conda alternative).

First, I installed bzip2 (needed for extracting micromamba):

sudo apt install -y bzip2

Then downloaded and initialized micromamba:

cd ~
curl -L https://micro.mamba.pm/api/micromamba/linux-64/latest | tar -xvj
./bin/micromamba shell init -s bash -r ~/micromamba
exec $SHELL

4. Creating a Python Environment

I created an environment named llm with Python 3.11:

micromamba create -y -n llm python=3.11
micromamba activate llm

5. Installing PyTorch with RTX 5070 Ti Support

Here’s where I hit my first big roadblock. The PyTorch stable builds didn’t yet support my compute capability 12.0 (Blackwell architecture). The fix was to install the nightly cu128 build of PyTorch, which does include sm_120 support:

pip install transformers datasets accelerate peft bitsandbytes trl sentencepiece evaluate

Transformers – Hugging Face’s main library for working with pre-trained models (like GPT, BERT, etc.), including easy APIs for loading, running, and fine-tuning them.

Datasets – A fast, memory-efficient library for loading, processing, and sharing large datasets used in machine learning.

Accelerate – A tool from Hugging Face that makes it simple to run training across CPUs, GPUs, or multiple devices with minimal code changes.

PEFT (Parameter-Efficient Fine-Tuning) – A library for applying lightweight fine-tuning methods like LoRA so you can adapt large models without retraining all parameters.

Bitsandbytes – A library for quantizing models (e.g., 8-bit, 4-bit) to save memory and speed up inference/training, especially on GPUs.

TRL (Transformers Reinforcement Learning) – Hugging Face’s library for training transformer models with reinforcement learning techniques like RLHF (Reinforcement Learning from Human Feedback).

SentencePiece – A tokenizer library that helps split text into subword units, especially useful for multilingual and large-vocabulary models.

Evaluate – A library to easily compute machine learning metrics (like accuracy, BLEU, ROUGE, etc.) in a standardized way.

6. Installing AI Libraries

With PyTorch sorted, I installed the Hugging Face ecosystem and related tools:

pip install transformers datasets accelerate peft bitsandbytes trl sentencepiece evaluate

7. Testing GPU Inference

To confirm everything worked, I ran a small model on GPU:

from transformers import AutoTokenizer, pipeline

model_id = "TinyLlama/TinyLlama-1.1B-Chat-v1.0"
tok = AutoTokenizer.from_pretrained(model_id)
pipe = pipeline("text-generation", model=model_id, tokenizer=tok, device_map="auto")

print(pipe("Explain LoRA in one sentence.", max_new_tokens=50)[0]["generated_text"])

The output came back quickly — and my GPU usage spiked in nvidia-smi — a great sign that everything was working.

8. Conclusion

With this setup, I can run and fine-tune open-source GPT models entirely on my RTX 5070 Ti inside WSL. It’s a clean, isolated environment that avoids Windows-specific headaches and keeps me close to the Linux ecosystem most AI tooling is built for.

If you’re working with a newer NVIDIA GPU, don’t be surprised if you need to grab nightly builds until stable releases catch up. Once you do, you’ll be able to enjoy the full speed of your hardware without leaving the comfort of Windows.

Fixing “spawn npx ENOENT” in Windows 11 When Adding MCP Server with Node/NPX

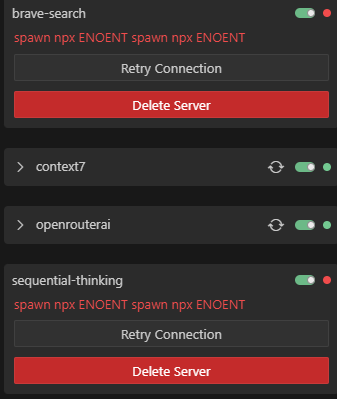
If you’re running into the error:

spawn npx ENOENT

while configuring an MCP (Multi-Context Plugin) server on Windows 11, you’re not alone. This error commonly appears when integrating tools like @upstash/context7-mcp using Node.js environments that rely on NPX, especially in cross-platform development.

This post explains:

  • What causes the “spawn npx ENOENT” error on Windows
  • The difference between two MCP server configuration methods
  • A working fix using cmd /c
  • Why this issue is specific to Windows

The Problem: “spawn npx ENOENT”

Using this configuration in your .mcprc.json or a similar setup:

{
  "mcpServers": {
    "context7": {
      "command": "npx",
      "args": ["-y", "@upstash/context7-mcp@latest"]
    }
  }
}

will cause the following error on Windows:

spawn npx ENOENT

This indicates that Node.js tried to spawn npx but couldn’t locate it in the system’s PATH.

Root Cause: Windows vs Unix Shell Behavior

On UNIX-like systems (Mac/Linux), spawn can run shell commands like npx directly. But Windows behaves differently:

  • Windows expects a .exe file to be explicitly referenced when spawning a process.
  • npx is not a native binary executable; it requires a shell to interpret and run it.
  • Node’s child_process.spawn does not invoke a shell by default unless specifically instructed.

In the failing example, the system tries to invoke npx directly as if it were a standalone executable, which doesn’t work on Windows.

The Fix: Wrapping with cmd /c

This configuration solves the issue:

{
  "context7": {
    "command": "cmd",
    "args": [
      "/c",
      "npx",
      "-y",
      "@upstash/context7-mcp@latest"
    ]
  }
}

Explanation

  • "cmd" invokes the Windows Command Prompt.
  • "/c" tells the shell to execute the command that follows.
  • The rest of the line (npx -y @upstash/context7-mcp@latest) is interpreted and executed properly by the shell.

This ensures that npx is resolved correctly and executed within a compatible environment.

Technical Comparison

Configuration Style Works on Windows? Shell Used? Reason
"command": "npx" No No Tries to execute npx directly without shell
"command": "cmd", "args": ["/c", "npx", ...] Yes Yes Executes the command within the Windows shell, allowing proper resolution

Best Practices

When using Node.js-based CLI tools across platforms:

  • Wrap shell commands using cmd /c (Windows) or sh -c (Unix)
  • Avoid assuming that commands like npx are executable as binaries
  • Test your scripts in both Windows and Unix environments when possible

Conclusion

If you’re encountering the spawn npx ENOENT error when configuring MCP servers on Windows 11, the fix is straightforward: use cmd /c to ensure shell interpretation. This small change ensures compatibility and prevents runtime errors across different operating systems.

Scraping JSON-LD from a Next.js Site with Crawl4AI: My Debugging Journey

Scraping data from modern websites can feel like a puzzle, especially when they’re built with Next.js and all that fancy JavaScript magic. Recently, I needed to pull some product info—like names, prices, and a few extra details—from an e-commerce page that was giving me a headache. The site (let’s just call it https://shop.example.com/products/[hidden-stuff]) used JSON-LD tucked inside a <script> tag, but my first attempts with Crawl4AI came up empty. Here’s how I cracked it, step by step, and got the data I wanted.

The Headache: Empty Results from a Next.js Page

I was trying to grab details from a product page—think stuff like the item name, description, member vs. non-member prices, and some category info. The JSON-LD looked something like this (I’ve swapped out the real details for a fake example):

{
  "@context": "https://schema.org",
  "@type": "Product",
  "name": "Beginner’s Guide to Coffee Roasting",
  "description": "Learn the basics of roasting your own coffee beans at home. Recorded live last summer.",
  "provider": {
    "@type": "Organization",
    "name": "Bean Enthusiast Co."
  },
  "offers": [
    {"@type": "Offer", "price": 49.99, "priceCurrency": "USD"},
    {"@type": "Offer", "price": 59.99, "priceCurrency": "USD"}
  ],
  "skillLevel": "Beginner",
  "hasWorkshop": [
    {
      "@type": "WorkshopInstance",
      "deliveryMethod": "Online",
      "workshopSchedule": {"startDate": "2024-08-15"}
    }
  ]
}

My goal was to extract this, label the cheaper price as “member” and the higher one as “non-member,” and snag extras like skillLevel and deliveryMethod. Simple, right? Nope. My first stab at it with Crawl4AI gave me nothing—just an empty [].

What Went Wrong: Next.js Threw Me a Curveball

Next.js loves doing things dynamically, which means the JSON-LD I saw in my browser’s dev tools wasn’t always in the raw HTML Crawl4AI fetched. I started with this basic setup:

from crawl4ai import AsyncWebCrawler
from crawl4ai.extraction_strategy import JsonCssExtractionStrategy

schema = {
    "name": "Product Schema",
    "baseSelector": "script[type='application/ld+json']",
    "fields": [{"name": "json_ld_content", "selector": "script[type='application/ld+json']", "type": "text"}]
}

async def extract_data(url):
    async with AsyncWebCrawler() as crawler:
        result = await crawler.arun(url=url, extraction_strategy=JsonCssExtractionStrategy(schema))
        extracted_data = json.loads(result.extracted_content)
        print(extracted_data)

# Output: []

Empty. Zilch. I dug into the debug output and saw the JSON-LD was in result.html, but result.extracted_content was blank. Turns out, Next.js was injecting that <script> tag after the page loaded, and Crawl4AI wasn’t catching it without some extra nudging.

How I Fixed It: A Workaround That Worked

After banging my head against the wall, I figured out I needed to make Crawl4AI wait for the JavaScript to do its thing and then grab the JSON-LD myself from the HTML. Here’s the code that finally worked:

import json
import asyncio
from crawl4ai import AsyncWebCrawler

async def extract_product_schema(url):
    async with AsyncWebCrawler(verbose=True, user_agent="Mozilla/5.0") as crawler:
        print(f"Checking out: {url}")
        result = await crawler.arun(
            url=url,
            js_code=[
                "window.scrollTo(0, document.body.scrollHeight);",  # Wake up the page
                "await new Promise(resolve => setTimeout(resolve, 5000));"  # Give it 5 seconds
            ],
            bypass_cache=True,
            timeout=30
        )

        if not result.success:
            print(f"Oops, something broke: {result.error_message}")
            return None

        # Digging into the HTML myself
        html = result.html
        start_marker = '<script type="application/ld+json">'
        end_marker = '</script>'
        start_idx = html.find(start_marker) + len(start_marker)
        end_idx = html.find(end_marker, start_idx)

        if start_idx == -1 or end_idx == -1:
            print("Couldn’t find the JSON-LD.")
            return None

        json_ld_raw = html[start_idx:end_idx].strip()
        json_ld = json.loads(json_ld_raw)

        # Sorting out the product details
        if json_ld.get("@type") == "Product":
            offers = sorted(
                [{"price": o.get("price"), "priceCurrency": o.get("priceCurrency")} for o in json_ld.get("offers", [])],
                key=lambda x: x["price"]
            )
            workshop_instances = json_ld.get("hasWorkshop", [])
            schedule = workshop_instances[0].get("workshopSchedule", {}) if workshop_instances else {}
            
            product_info = {
                "name": json_ld.get("name"),
                "description": json_ld.get("description"),
                "providerName": json_ld.get("provider", {}).get("name"),
                "memberPrice": offers[0] if offers else None,
                "nonMemberPrice": offers[-1] if offers else None,
                "skillLevel": json_ld.get("skillLevel"),
                "deliveryMethod": workshop_instances[0].get("deliveryMethod") if workshop_instances else None,
                "startDate": schedule.get("startDate")
            }
            return product_info
        print("No product data here.")
        return None

async def main():
    url = "https://shop.example.com/products/[hidden-stuff]"
    product_data = await extract_product_schema(url)
    if product_data:
        print("Here’s what I got:")
        print(json.dumps(product_data, indent=2))

if __name__ == "__main__":
    asyncio.run(main())

What I Got Out of It

{
  "name": "Beginner’s Guide to Coffee Roasting",
  "description": "Learn the basics of roasting your own coffee beans at home. Recorded live last summer.",
  "providerName": "Bean Enthusiast Co.",
  "memberPrice": {
    "price": 49.99,
    "priceCurrency": "USD"
  },
  "nonMemberPrice": {
    "price": 59.99,
    "priceCurrency": "USD"
  },
  "skillLevel": "Beginner",
  "deliveryMethod": "Online",
  "startDate": "2024-08-15"
}

How I Made It Work

Waiting for JavaScript: I told Crawl4AI to scroll and hang out for 5 seconds with js_code. That gave Next.js time to load everything up.DIY Parsing: The built-in extractor wasn’t cutting it, so I searched the HTML for the <script> tag and pulled the JSON-LD out myself.Price Tags: Sorted the prices and called the lowest “member” and the highest “non-member”—seemed like a safe bet for this site.

What I Learned Along the Way

  • Next.js is Tricky: It’s not just about the HTML you get—it’s about what shows up after the JavaScript runs. Timing is everything.
  • Sometimes You Gotta Get Hands-On: When the fancy tools didn’t work, digging into the raw HTML saved me.
  • Debugging Pays Off: Printing out the HTML and extractor output showed me exactly where things were going wrong.

Powered by WordPress & Theme by Anders Norén